Saturday 3 October 2015

Blockheads v.s. Times Square Quilt --- A hidden quilt binding.

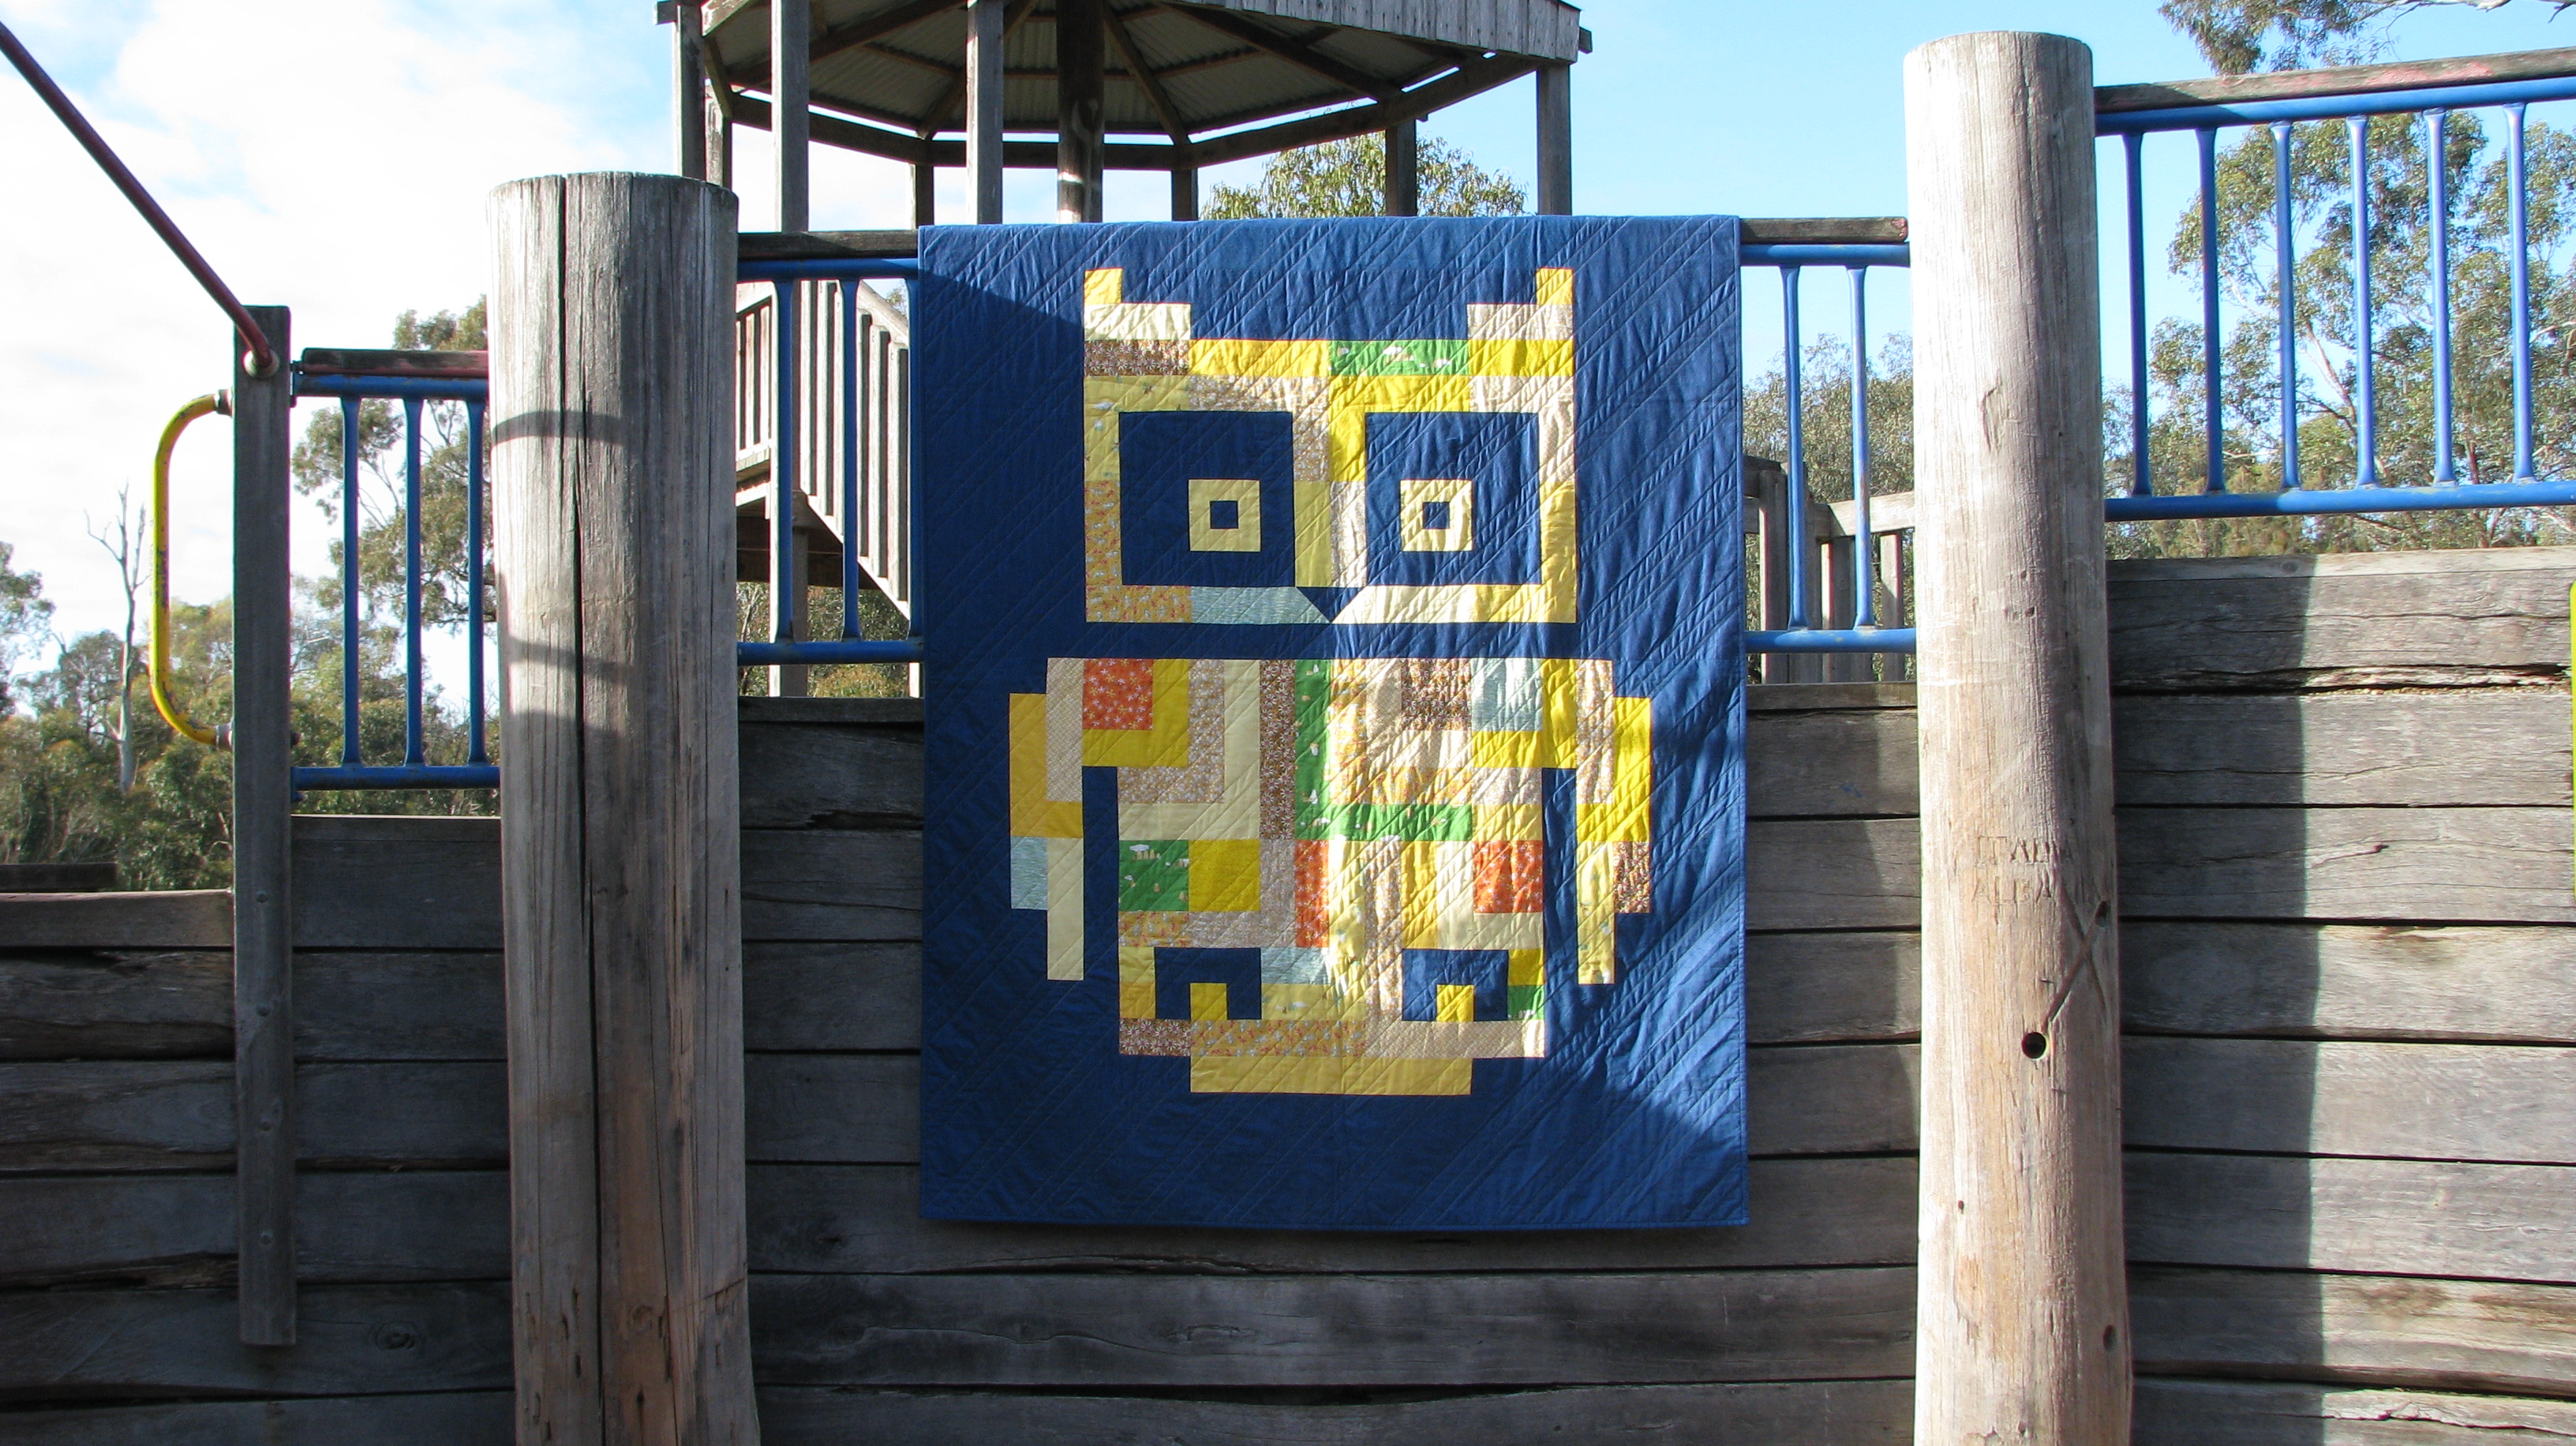
Each time when I sat down to write about this quilt I ended up writing about a quilt that I have just 'freshly' made. This quilt was one of my UFO that took me over a year to complete. It is intending for my son, as he has grown out of this old quilt, which you can see from here. So I decided to make one that will last for longer, at least for a couple of years. This pattern, as well as my previous Hootenanny quilt, both are designed by Boo Davis. You can find the pattern in her book "Dare to be square quilting."


The piecing for Blockheads quilt is relatively easy, it is based on the housetop block design. What took me so long was those cute smiley faces as I decided to hand stitch each and every one of them. There are 29 smiley faces in total, and I must admit hand stitching is not as much fun as I had imagined, even with the TV on. It is a test of patience and I could only hand stitch one or two at a time and then I am off working on other quilts!


I am not sure if there is a right way of hand stitching, but I basically following the Stitching Tips and Tricks from Melly & Me. Melanie McNeice is the driving force behind Melly & Me. She does make quilts but you might know her from her bright and colourful fabric collections, or her famous contemporary, cute and funky toy and bag sewing patterns. Having no formal training or friends who could sew I had many challenges when I fist began quilting. When I felt frustrated with the lack of skills I had I turned to Melly & Me's sewing pattern. I made a few toys using her pattern, and built up my sewing confidence from there.


The colour scheme I have chosen for this quilt are Kona Cotton's Papaya and Cyan Blue, Cotton Couture's Bright White and Prima Homespun's Green Apple from my local spotlight shop. I use matching treads for my stitching.


For this quilt I use hidden / invisible binding, or also known as knife-edge binding. What I want to achieve for this quilt is the minimal, clean look. So I don't want the binding to frame this quilt and distract the square blocks.

There are many blogs that will show you how to create a hidden binding but I use this method with a slight variation. As this is my this time sewing a hidden binding I cut 2.5" for my binding strips instead of 2". Additionally, instead of "fold and press under 1/2" on one side of each binding strip" as my final binding edge to hand stitch the binding I folded and press the binding strips in half and sew it onto the edge of the quilt. Just like how you would normally sew the binding. I prefer this way because the edge is only slightly thicker but since it is folded in half you don't have to take time or worry about pressing a consistent 1/2" for binding. All you need is to use iron and press the binding to the back of the quilt and you are ready to hand stitch your binding like you normally would.

The pictures below will show you what the binding would look like from the side and the back of the quilt.


Using this method of binding means there are wider than normal strips of binding can be seen at the back of the quilt. Hence you really need to plan your fabric choice more carefully so the binding fabric and the backing fabric would blend in. In my case I use  Cotton Couture's Bright White for both binding and backing fabric.


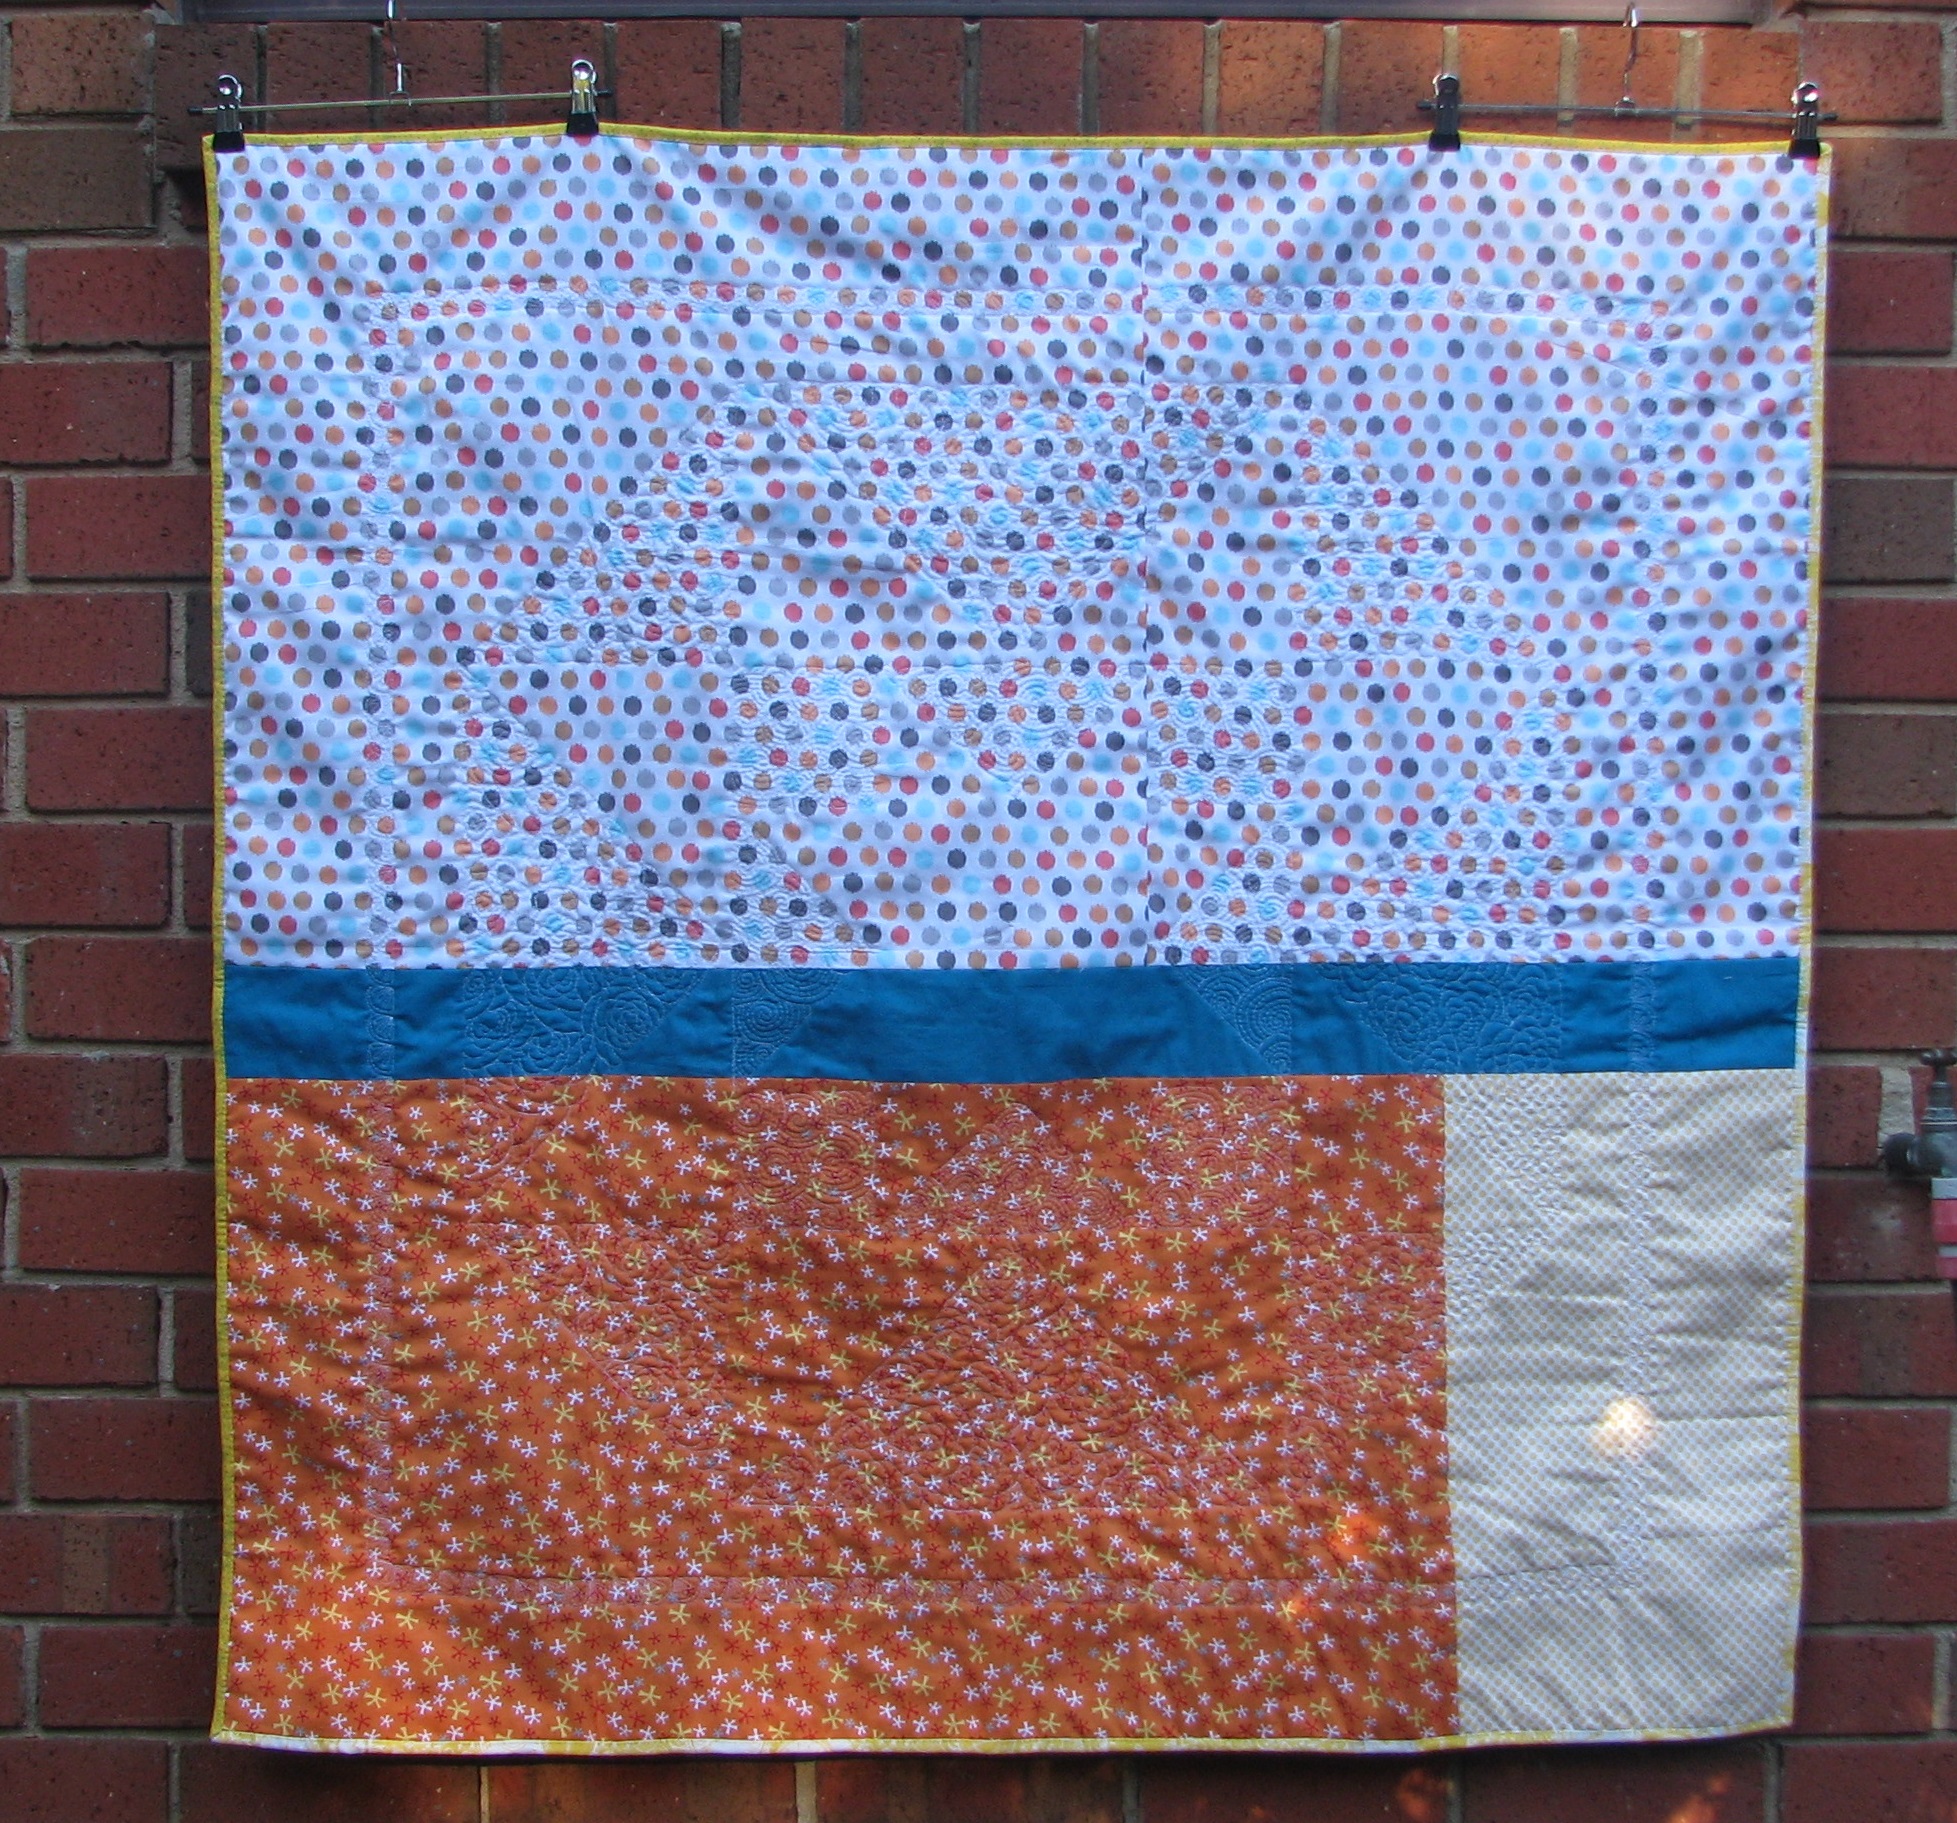
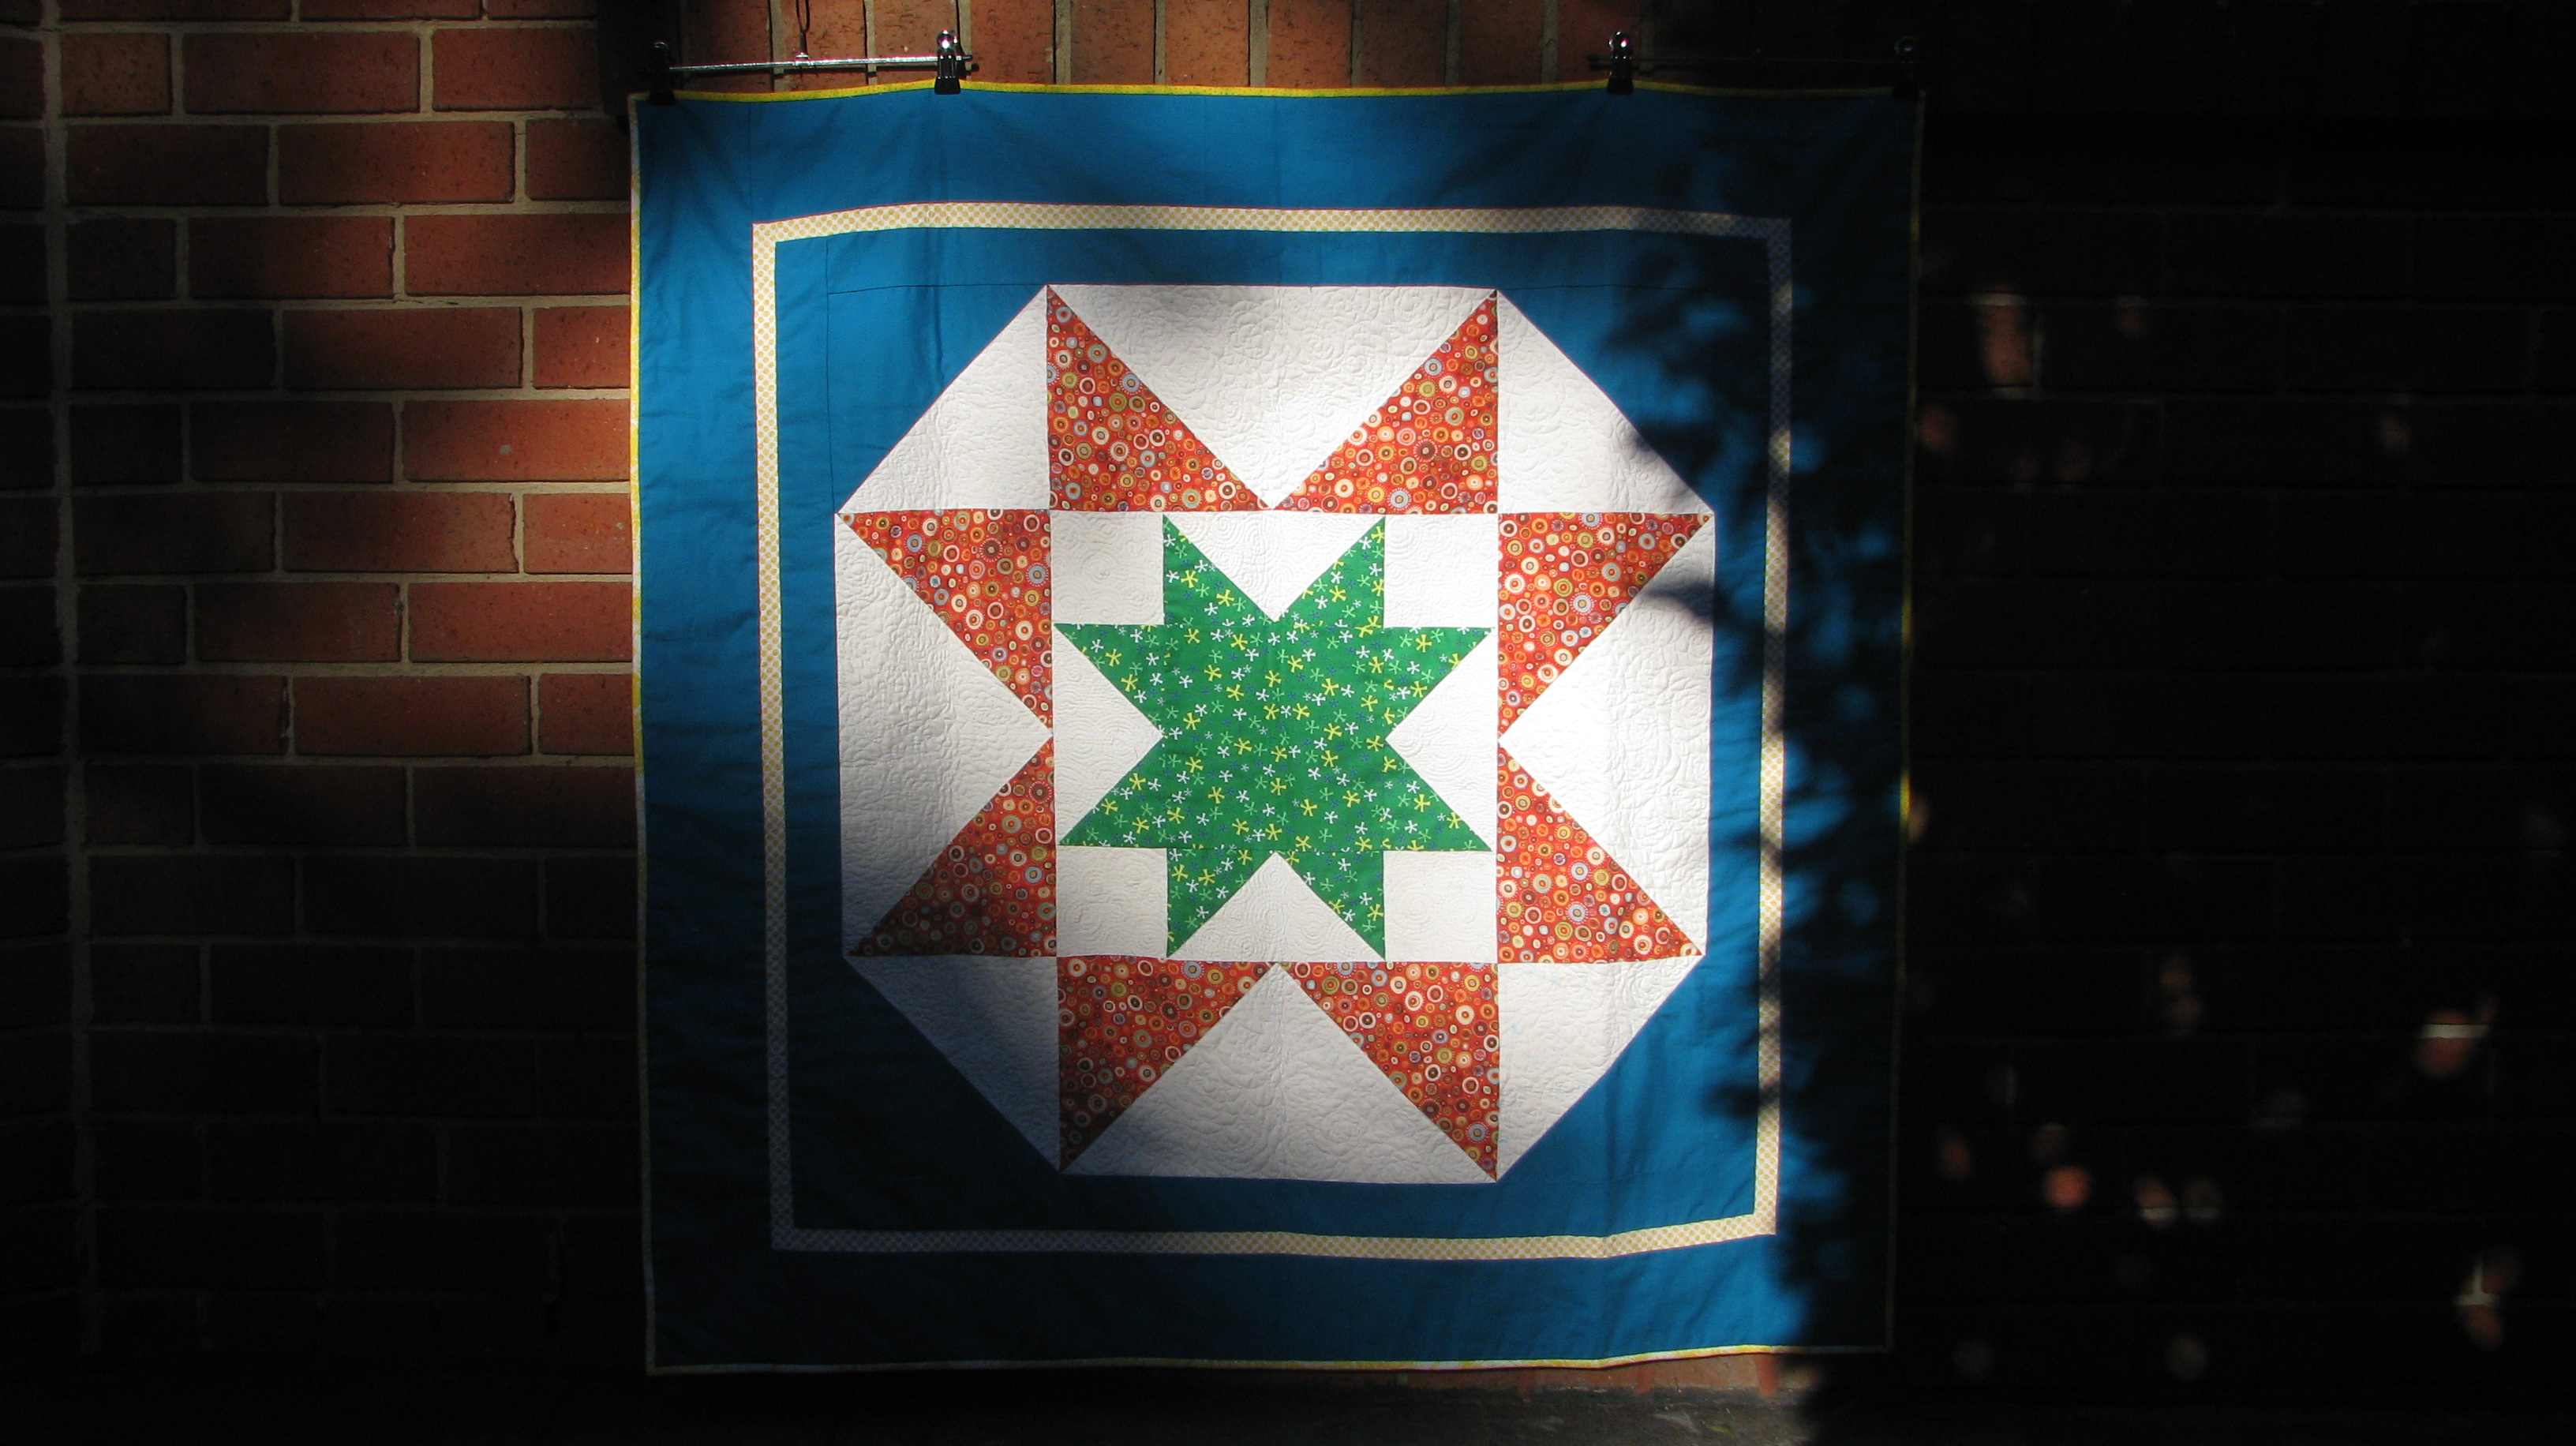
The back of the quilt I use the same colour scheme as the front. This simple and elegant pattern is called Times Square Quilt from the book Vintage Quilt Revival: 22 Modern Quilt Design from Classic Blocks By Katie Clark Blakesley, Lee Heinrich, and Faith Jones. This is one of my favourite quilt book, where you can see solids or near solid fabrics at play with the pattern design. The end result is the clean defined quilt block arranged in a modern twist, giving each quilt block a brand new look.


Now that it's finished it's time to give it a wash and enjoy it!

Thank you for stopping by. Erica.


Friday 7 August 2015

Hootenanny Quilt

The journey of this quilt began with a girl who is turning 7 in a few days. She is my son's good friend and classmates for the past 2 grades. She is always polite and (according to my son) her favourite colour is yellow, and then blue. As for me, whenever she smiles she reminds me of sunflower --- bright and happy. This quilt is going to be her 7th birthday present.


I love making baby quilts and quilts for children. But I must admit that making a quilt for someone you know can be difficult, particularly in choosing the 'right' design. Not to mention there is the pressure of a deadline, which is a bit like entering a quilt challenge, trying to get it done before the date of her birthday party. It took me weeks to decide the pattern of the quilt, in consultation with my son, of course. As he knows his friend's taste better than I do. I hope.


Next is the colour scheme, going through my stash, pulling out all the lovely yellow fabrics I have and some other fabric for accents. Slicing, and playing with the placement of the fabric for a few weeks until I am happy with the arrangement, racing through to the end of quilting and binding.


This is also my first quilt using some "shot cotton" from my local Spotlight store. Shot cotton is basically a cotton fabric that is woven in 2 different colours of thread in its length-wise and cross-wise wrap. In my case my shot cotton is made up of blue and black woven together to give it a varied blue, black tone.


Unfortunately I didn't pay more attention to differentiate the front and back side of the shot cotton, and only when I finish my quilt did I realise that one side is slightly lighter than the other side. Having said that the difference is not terribly visible and I am very happy with the end result. The texture of shot cotton makes the negative spaces interesting since it is not completely solid in colour, it provides depths as the fabric gives different colour or shade of blue depending on the reflection of the light. Not to mention it is also soft to the touch. This quilt should be big enough to last and grow with her for many years to come.


You can find this quilt pattern in "Dare To Be Square Quilting" by Boo Davis. This is one of my favourite book and I have made a few quilts from this book. You can view it from my Flickr.

As for the back of this quilt, I used Lauren and Jessi Jung's "Hideaway" (Swiss Alpine Village in the Forest) and "Botany" fabric collection (Topiary in yellow) that I have saved.


I am going to give it good wash, dry it and wrap it up --- just in time for her birthday! Phew!

Thanks for reading,
Erica

Sunday 31 May 2015

Skinny Strip Quilt

When I saw this quilt pattern I instantly fell in love with it. It has all the colors of the rainbow! I just want to make one, as I could already imagining myself snuggle up in this quilt on the couch. After a quick check of my fabric stash,  I have some left over strips from a jelly roll which is perfect for this project.


I had so much fun arranging the strips, it is a great exercise on playing with different colors and see what color combination works well and what you don't like. I also love how the solids gives a clear, crisp shape and without the distraction of prints.


As for the back of this quilt I pulled out one of my favourite fabric called Crosshatch Sketch from Timeless Treasure. It is a tone-on-tone fabric with crosshatch / imperfect sketch-like grid that gives the quilt a bit more texture and depth.


After making many quilts for children and friends I think I will keep this one for myself!

Thank you for stopping by!

Cheers,
Erica.

Tuesday 31 March 2015

Baby Star Quilt (a.k.a. “Happy Birth Day, Baby” Mystery Quilt)

When I started making quilts I was really into making baby quilts, for the obvious reason of its size as it is easier for me to sew. As my son grow older, he gets a newer and larger quilts every couple of years. It became my little mission to make and sew baby/children's quilt as I think every child should have their own little unique quilt to cuddle with, and to celebrate their lives. This quilt is just that, my surprise birthday present to my son's classmates's little brother who is about to turn 1. He is absolutely adorable!! When we pick up our kids from school I would often chat to him and he would smile and tries to talk back to me by making different sounds. His gorgeous smile is just enough to make you melt!

So I saw this quilt from Rachel's blog which lead me to the pattern. Coincidentally this pattern is called “Happy Birth Day, Baby Quilt" and without hesitation I went ahead and made it with a slight variation.

I add additional borders to frame the stars as I think it looks better for my quilt, braking up the solid dark teal with a 3/4 inch yellow border. 


I also had fun trying out free motion quilting on this quilt. I used Angela Walter's swirls and flower technique in the white negative space; and Lori Kennedy's "sand dollar" motif for the yellow border. Angela Walters' Craftsy class is really useful (my go-to lesson for FMQ), and there are so many techniques and patterns that are great for negative space quilting.

On the back you can get a clear look of the patterns where the solid strip is. It works like a treat adding another interest to the back of the quilt. I really like this and next time I might use only solid fabric for the backing so the FMQ patterns could stand out further.    


This is my last photo shot for the day, as the sun is about to go down. This is a simple and easy quilt to piece with many options to try out free motion quilt in the negative spaces.

I hope my receiver will enjoy this quilt! 


Now I am going to wash it before I wrap it up!

Cheers,
Erica


Thursday 19 February 2015

I am back!! and with Charm Pack Cherry Quilt.

6 months ago I have decided to go back to school to study early childhood education. I really wasn't sure what to expect as the last time I actually studied was back in my early twenties. There were lots of assignments and many late night but to my surprise I was actually enjoying learning and making new friends young and old. But in order to concentrate on my studies I also decided to stop quilting until I finish my course and leave my blog for the past months.

To get back into my 'quilting mood' I thought of starting a new but small project --- and this is where Charm Pack Cherry Quilt came about. The pattern is free and it can be found at Fat Quarter Shop. As suggested by the name of this quilt it is charm pack friendly, where you require 2 of each print and solid charm packs. 


As for the quilting I was inspired by Jacquie Gering's Craftsy class, "Creative quilting with your walking foot". Instinctively I knew I wanted to quilt it with continuous circle design. I think it worked well and I love how the circles create a second textural movement to the quilt.


I started with a quarter inch spacing and slowing extend the spacing to 1/2 inch; 1 inch and about 1 and 1/2 inches as it gets closer to the edge of the quilt, giving it a rippling effect. I had fun quilting it and I love the texture when I ran my hands across the quilt!


Now it is ready to meet its new own, a little angel who is expected to arrive in April!

Cheers,
Erica